Unlocking the Gateway: A Step-by-Step Guide on How to Enter BIOS on MSI Systems
The Tech Basic . Follow
6 months ago
Are you eager to delve into the heart of your MSI system but feeling a bit lost on how to access its BIOS? Fear not, for we're here to guide you through the labyrinth of settings and configurations with a concise, step-by-step approach. Whether you're a seasoned tech enthusiast or a newcomer to the world of BIOS, this comprehensive guide will equip you with the knowledge to navigate through MSI's BIOS interface effortlessly.
Step 1: Power Up Your MSI System
Before we embark on our BIOS journey, ensure your MSI system is powered off. Once powered down, press the power button to turn it on. As soon as the screen lights up, be vigilant and ready to tap the designated BIOS entry key repeatedly.
Step 2: Identify the BIOS Entry Key
Different manufacturers designate different keys to enter the BIOS. For MSI systems, the most commonly used BIOS entry key is the "Delete" key. However, some MSI systems might require different keys such as "F2" or "F10". Keep an eye out for on-screen prompts during startup that indicate the appropriate key to enter BIOS. In case you miss it, refer to your MSI system's manual or the manufacturer's website for clarification.
Step 3: Tap, Tap, Tap!
As soon as you power on your MSI system, start tapping the designated BIOS entry key repeatedly. Timing is crucial here; you need to be quick and precise. If done correctly, you'll be greeted with the BIOS interface shortly.
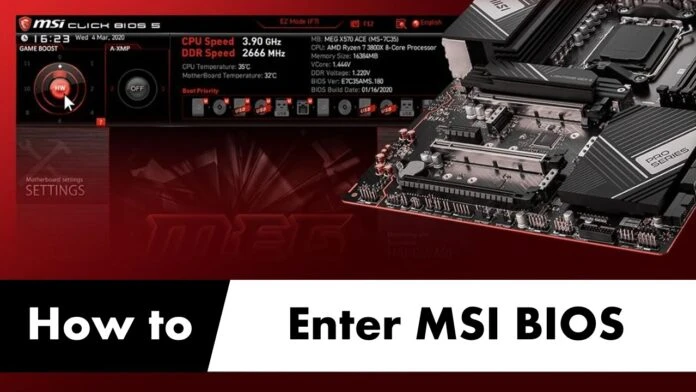
Step 4: Welcome to the BIOS Interface
Congratulations, you've successfully entered the BIOS on your MSI system! You'll now find yourself in a realm of intricate settings and options. Take a moment to familiarize yourself with the layout and navigation controls. The BIOS interface may vary slightly depending on your MSI system model and BIOS version, but the core functionalities remain consistent.
Step 5: Explore and Customize
Now that you've gained access to the BIOS interface, it's time to explore its myriad of options and customize settings to suit your preferences. From tweaking system configurations to adjusting boot priorities, the BIOS offers a plethora of customization options that can enhance your system's performance and functionality. However, exercise caution while making changes, as incorrect configurations could potentially disrupt your system's stability.
Step 6: Save and Exit
Once you've made the desired changes to your BIOS settings, don't forget to save your modifications before exiting. Look for the "Save & Exit" option within the BIOS interface and follow the on-screen prompts to confirm your changes. Your MSI system will then restart with the updated settings applied.
Conclusion
Mastering the art of entering BIOS on MSI systems is an essential skill for any tech enthusiast. With this step-by-step guide on how to enter BIOS MSI, you now possess the knowledge and confidence to unlock the full potential of your MSI system's BIOS. So go ahead, dive into the BIOS interface, and unleash the true power of your MSI hardware!
Recommended topics
Recommended from Guest Post
Singhal Industries
HDPE Pond Liners: A Comprehensive Guide to Durable and Eco-Friendly Water Containment Solutions
July 31, 2024


Muhammad Azam
The Increasing Trend of Divorces and the Technological Solution for Muslims
January 6, 2020
Hosting Seekers